Wednesday, July 31, 2013

NARS: Realm Of The Senses & Soulshine

As I've said before I've never met a NARS product I didn't love and these two newly released blush palettes are no exception! I do believe in the saying "You get what you pay for" and that has been true for me with each NARS purchase. I don't mind paying for a good quality product. As you will see below these two blushes are stunning and a must have for the remainder of summer. I will even be carrying these beauties over into fall and winter!

Realm Of The Senses:
Golden, pink, bronze glow is how I would best describe how the color looks on me.

Soulshine:
Pink, peachy, coral, golden, bronze glow is how I would best describe how the color looks on me.

Both have tiny specks of golden glitter. Just the right amount where mature women can feel comfortable wearing it without feeling like a teenager. Both blushes are very pigmented and can be applied lightly for more everyday wear or heavier depending on your preference.

I have to admit these blush palettes are similar. I don't think it's necessary to purchase both for this reason. However I do believe once applied on the skin you can tell the difference. Skin tone will play a big part in bringing forth the differences in color once applied on the face.

Both palettes will be released 8/1/13 exclusively at Sephora.

I'm not certain if these are limited edition or if they'll be apart of the permanent blush line so if you are interested I suggest you head to your nearest Sephora counter and check them out or purchase online.

Tuesday, July 23, 2013

NOTD: Nail of The Day


Polka Dot Accent Nail

I wanted to try something different for my weekly mani so this is what I came up with using all Zoya nail polishes. ( See previous post to see what I use for base coat, top coat and insta dry top coat)

Blu: Light Blue
Robyn: Blue
Sweet: Baby Pink

I polished my nails as usual. Once the accent nail dried completely I took the end of a bobby pin (pictured below) dipped it in the baby pink color and made small polka dots on the nail. Easy Peezy!! No worries if it's not perfect it's all about having fun experimenting with different colors/designs. Let me know if you try this. I'd love to see it!!


Thursday, July 18, 2013

RiRi Boy Dupe

I was going through my lipsticks today and discovered an almost spot on dupe for MAC's RiRi Boy, a gorgeous lavender/purple-ish color with a retro matte finish.

Corvergirls's Divine Divine 330 is a close runner up. The only noticeable difference is the finish. Divine Divine is a very creamy, bright shiney moisturizing lipstick while RiRi Boy is a very dry, matte, dull lipstick. Both are gorgeous shades of purple and will easily compliment multiple skin tones. I would recommend wearing a little lip balm under RiRi Boy to combat the dryness. Also please note that Divine Divine will stain the lips. All in all these are two great choices if you're in the market for a lavender/purple lipstick. If you don't want to fork over the $15 for MAC then Covegirl's Divine Divine is the way to go.

Tuesday, July 16, 2013

Marvelous Mauve's

Nude Mauve's

Who doesn't love a nude/mauve color? I do and I have found the perfect pair to rotate between. There is a 3rd on the horizon but it is currently sold out. As soon as I get the "in stock" email I will be placing my order because of course, I must have it. I will come back with an update as soon as I receive it. Until then lets talk about Lancome's Vintage Rose and Buxom's Hooligan. Can you say perfection? That is exactly what these two lipsticks are for me...Perfection! Perfect creamy consistency and perfect color for my skin tone. I'm almost certain that anyone could pull these colors off. Their like my lips but better. I say that because the natural color of my lips is similar to the color and undertone of the lipstick which makes for a perfect nude. That's not to say that you can't see the mauve when the color is applied but on me I feel like I can get away with calling it a nude. On lighter skin tones I think the colors would show as a true mauve, not as nude toned. Either way you can't go wrong with either one. Both are great for a nude summer look and will be great moving into fall. Needless to say I have definitely elevated these two products to my holy grail list of beauty products for the lips. Go out and grab a nudey-mauve!!


Sunday, July 14, 2013

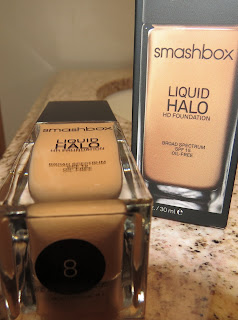
Smashbox Liquid Halo HD Foundation & Small Haul


Smashbox Cosmetics

I decided to do a little shopping this weekend and thought I'd share. I picked up some high end and budget items. If I like it I buy it!! If it's $200.00 or $20.00 and it peaks my interest I'll make the purchase. I shop everywhere from Target to Nordstrom and everywhere in between.

The Foundation
Nordstrom was one of my stops this weekend to purchase the newly released (released 7/10/13) Smashbox Liquid HD Foundation. I also purchased their new Photo Op Eye Brightening Mascara Illuminateur and the Photo Set Finishing Powder. There was a representative/make up artist from Smashbox at Nordstrom specifically for the launch of this new foundation. Needless to say I was like a kid in a candy store.

I decided to have Smashbox's make up artist make up my face using the Liquid Halo Foundation. I knew I was in love instantly. The foundation is perfect for my combination dry/oily skin. It applied smooth, no clumping, no streaks, non greasy and non drying. Believe it or not of all the make up I own I only have one foundation and one tinted moisturizer. I am not big on foundation. If and when I do decide to wear anything it's never full coverage. My skin is my skin and I'm comfortable in it however imperfect it may be. There are those days though that I want to get a little cute and fancy! LoL This foundation will be my go to for those cute and fancy days. I would consider this foundation sheer to medium coverage but buildable.


  • Light weight
  • Sheer to medium coverage but buildable
  • No "cake face" look
  • Goes on super smooth
  • Last all day
  • Skin is still touchable and soft
  • Not ashy looking


The Mascara
Elongated my lashes to the point I thought I had fake lashes on. If that's the look you are going for then this mascara is for you. I have to point out though that it's hard for me to be blown away by a mascara because my lashes are naturally long and full so the mascara is just enhancing what is already naturally there. It's not doing anything amazing to my lashes. Did I just toot my own horn? Yeap, TOOT TOOT, BEEP BEEP :)

Photo Set Finishing Powder
LOVE IT! Imagine finely milled silk...that's what this feels like. She applied it after the foundation, blush and bronzer and my face was "set" for the rest of the day. My makeup did not move until I removed it at the end of the evening. I'm impressed. This matte translucent oil-absorbing powder banishes shine and leaves you with a flawless finish.


Just me...Real Regular
A lil fancy in the face but still me. I love that I still look like me. I still see my face, my skin. My imperfections that make me...ME! I'm not caked under tons of foundation. This foundation is like a second skin. Very pleased with my purchase.


 Bonus Pic: Other items I picked up over the weekend. With the exception of these exceptional flats I purchased from payless.com for work. Every year/season I purchase a couple pairs of shoes to leave in my desk at work. I like these flats so much I might have to incorporate them into my regular wardrobe.
Shoes: Payless.com DexFlex comfort flat
Make Up: Smashbox from Nordstrom
Bangles and striped Vintage T's: Old Navy
Nailpolish: Sephora.com
Real Techniques Blush Brush: Ulta
Lipstick: Lancome from Ulta
Lipstick: Buxom from Sephora
Shorts: Torrid from at least 2yrs ago. Planned on wearing them today but ended up in Capri's instead


Professional Manicure At Home

DIY Mani (natural short nails)

Tired of paying for manicures where the color only last a good day or 2 before chipping? I have come up with a regimen for my nails where I am able to get anywhere from 4-5 days of a professional looking manicure before needing to re-manicure/paint my nails again.

First lets talk about my nails:

  • Weak
  • Thin
  • Peely
  • Soft
  • Up until about 5yrs ago I was a nail bitter. I made a conscious effort to stop. I had a new found love/obsession with nail polish and of course I wanted to use the polishes I had began to collect. 

Now lets talk about what I use to remedy my weak, thin, peely nails.

I have tried countless products that have claimed to strengthen my weak nails and help them grow but that never happened until I stumbled upon Nailtiques. I started off with Formula 2 PLUS and I saw a difference almost immediately. Within the first 2-3 days I noticed a difference in the appearance of my nails, strength of my nails and growth. Yes, noticeable growth! Per the instructions Nailtiques should be applied in a thin layer everyday for a week. At the end of the week all layers need to be removed with nail polish remover and the process starts again until you get the desired result.  Once my nails were healthy I started using Nailtiques every other day. Currently I am no longer using Formula 2 PLUS but have moved on to Formula 2 and only apply it once a week or however many times per week I choose to change my polish. What I love most about Nailtiques is it doesn't stop working even after you've stopped using it regularly. In my opinion the product has completely changed my nails. You never would guess by looking at my nails now that they were ever as horrible as they were.

The Manicure:

Remove old polish/residue from nails using polish remover. I prefer Zoya's 3 in 1 remove plus. It's a polish remover, nail cleaner and nail prep all in one. 


Apply a cuticle remover. I prefer Be Natural Cuticle Eliminator. Does exactly what it claims...Eliminates overgrown cuticles. I apply to each cuticle working only one hand at a time as I have noticed in the past if I apply to all 10 fingers and began working on one hand by the time I'm ready to start on the other hand the product has started to dry and leave yellow staining. Gently clean around nail and gently push back cuticles. Wash hands with warm soapy water when done. Start the next hand. Most people don't like to cut their cuticles, I do. It's all about preference. After washing the cuticle remover off is when I would cut/trim away any excess dead skin/cuticle.


Time to gently file, shape and buff. At this point, before filing I like to apply a cuticle oil to my cuticles and skin around the nail. I rub in the oil and then proceed. I prefer CND Solar Oil. 


After shaping/lightly buffing nails wash hands with warm soapy water to remove any excess oil. It's time to polish!! Apply one thin coat of Nailtiques (For those of you who naturally have strong healthy nails, Skip this step)

Apply a base coat. I prefer CND Stickey Anchoring Base Coat. Let dry 1-2 minutes


Apply your color of choice. Today I have chosen Butter London in the color Trout Pout. The main question I get is "How do you paint your nails so neatly?" The only way I can answer that is "Practice makes Perfect" and a steady hand of course. I take my time. Let dry 1 to 2 minutes or more depending on how many coats of polish you are using.


In my opinion and experience the next 2 products add the staying power needed for my manicures to last more than a day or two.
Apply a no chip top coat. I prefer Revlon's Extra Life No Chip Top Coat. Let dry 1 to 2 minutes.


Apply a quick dry anti-chip top coat. I prefer Sally Hansen Insta-Dri Anti-Chip Top Coat


And wallah!! There you have it. The perfect at home manicure that was free and will last longer than the manicure you would have paid for. 

The following pictures are from my last mani which lasted me from Monday night - Saturday. Also keep in mind that I have natural hair and so does my daughter. What that means is my hands are constantly in water, oil, conditioner or some sort of moisturizer not to mention I'm a chronic hand washer. Me and germs don't get along.
LEFT HAND 
RIGHT HAND


Bonus Pics:
Lets see how many days today's mani will last

Nails with one thin coat of Nailtiques


Monday, July 8, 2013

Fun With Buns!

Cute Bun Styles for Kids

Products used: (these are my daughters staple products and what works for her hair)
  • Passion Fruit Curl Control Paste by Curls - Purchased from Target. Used for laying down edges.
  • Bee Mine Bee Hold Curly Butter - Purchased from http://beemineproducts.com/  Used for helping with frizz and laying down unruly curls without the crunch and stickiness of a gel.


How I style:

I start with dry stretched out hair. Hair that has either been in 2 strand twist, dry twist out, braid out or individual pony tails. 
  • Mist hair with a little water, add moisturizer or oil of choice, detangle with a wide tooth comb. Misting hair with water is optional. I do not dry comb my daughters hair.
  • Brush hair up into a high pony tail. Once hair is brushed up into desired position add a edge control product of your choice and brush in product until edges are smooth
  • Use an ouchless pony tail holder to place hair in a high pony tail. (I do not use pony tail holders with metal closures as they pull, snag and break hair)
  • Once hair is secure in ponytail separate sections of pony tail hair and either braid or 2 strand twist. The size of your braids/twist can vary. It all depends on the look you are trying to achieve.
  • After you have completed your twist/braids start wrapping the twist/braids in a circular motion to create your bun. 
  • Pin down the braids/twist with hair/bobby pins until you achieve the desired style
What to do at bed time: Pick some of these methods or all. Most important, do what works best for you and your little princess.

  • Sleep on a satin pillow case
  • Wrap a satin scarf around the edges leaving the bun exposed at the top
  • Put on a satin bonnet

What to do in the morning: If your little one sleeps as wild as my daughter does then your bun will need a little sprucing up the next day.

  • Take off satin, scarf/bonnet (that is, if it's still even on)
  • Assess the damage...LOL
  • Some braids/twist might need to be re-pinned
  • Add a dab of edge control to her edges and brush edges to lay down any hair that has frizzed up


TWISTED HIGH BUN


BRAIDED HIGH BUN
 
Related Posts Plugin for WordPress, Blogger...